Multimedia Desk
CAPABILITIES
Dual-screen LCD Projection, Document Camera, Multimedia Lectern, Wireless Microphone, DVD, CD, VHS, Wireless Ethernet
RESERVATIONS
For special events rooms reservations, please Submit a Reservation Request on the McCombs Intranet (McCombs account password protected.)
CONTROLS
On the wooden cabinet at the front of the room you will find the room's Crestron remote control. Touch the remote's screen to turn it on. This remote is used for most of the room's functions. Please return the remote to its recharger when you are finished with it.
LAPTOP COMPUTER PROJECTION
Connect the multimedia lectern's VGA cable (attached to the lectern) to the VGA port of your laptop computer. Turn on your computer, press the Projection ON, and PC buttons on the desk's touch screen. The lectern also has a computer audio cable and an AC power outlet.
VIDEO PLAYER
In the second wooden cabinet from the left is a DVD/CD player and a VCR. Use the controls on the machine for video functions, audio volume and video projector controls are on the room's remote control.
|
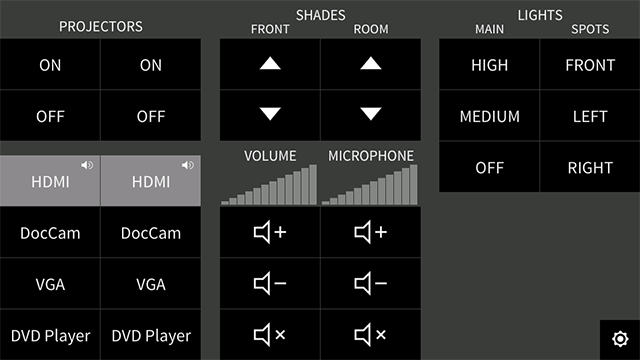
Crestron Remote Control Interface
|
Video Projection
- For an optimal video picture you may wish to dim the room lights and close the window shades using the Crestron remote control or wall switches (see Lights and Window Shades below.)
- There are additional instructions for the Computer, VHS/DVD/CD, and Doc Cam sources further down this page.
PROJECTORS "ON"
Turns on projector(s.)
PROJECTORS "OFF"
Turns off projector(s.) You must wait 2 minutes after the projector has been turned on before you can turn the projector off. Additionally, the projector will wait 90 seconds before it can be turned on again after it has been turned off. The projector(s) will automatically cool down for a set time before retracting into the ceiling.
VOLUME
Adjusts the presentation volume.
|
Source Selection
HDMI
Selects the HDMI input to be displayed on the screen.
DOC CAM
Selects the document camera input to be displayed on the screen.
VGA
Selects the Laptop Computer Projection input to be displayed on the screen.
DVD PLAYER
Selects the DVD/CD/VHS player to be displayed on the screen.
|
Laptop Cable Connection, Multimedia Lectern Adjustment
LAPTOP CABLE CONNECTION
- The multimedia lectern has a built-in power outlet (at its base) and PC audio and VGA video cables (see upper image on the right) for connecting your laptop to the LCD video projector. The lectern also has an Ethernet cable for laptops without wireless capabilities. NOTE: Before using any application that accesses the University network through either a public Ethernet or wireless port, you must first open an internet browser application and login to the page that you are automatically directed to with your UTEID. If you have forgotten your UTEID, please visit the UT EID Self-Service Tools page for assistance.
- To connect your laptop computer for video projection, simple plug in the lectern's VGA cable to the VGA port of your laptop computer. There is another VGA connection available under the main floor port as an alternate in case there is a problem with the wireless video signal. If there is audio in your presentation you will also need to connect the available PC audio cable. Turn on your computer, press the Projection ON and Computer Source buttons for the screens that you wish to use on the Crestron remote control. If your laptop's screen appears on the room's screen you are ready to go, if not, you may need to mirror your laptop's screen onto the projector. To do this on a Dell computer, hit the FN and F8 keys at the same time until you see your laptop content on the screen. Hitting FN-F8 successively will scroll through the available viewing choices. The command to mirror your laptop's screen may be different on other manufacturer's computers, if you have any questions please consult this Laptop Activation Chart.
MULTIMEDIA LECTERN HEIGHT ADJUSTMENT
The Multimedia and Document Camera lecterns are height-adjustable. Under the right-rear of the lectern there is a lever that will allow you to raise or lower the lecterns.
|
Lights and Window Shades
- The room lights and window shades may be controlled by using either the Crestron remote or the wall switches.
USING THE CRESTRON REMOTE CONTROL
Lights
- Main
The High button turns on all of the lights, the Med button turns on the back three rows of lights. The Off button turns off the lights.
- Spots
The Front, Left and Right buttons turn on their corresponding spot lights, hitting the Front, Left and Right buttons again turns off the lights.
Window Shades
- Blinds Front
These buttons raise and lower the shades at the front of the room.
- Blinds Room
These buttons raise and lower all of the shades in the room.
USING THE WALL SWITCHES
- The top two buttons on the wall switches turn the room lights on and off. The lower two switches control the window shades for the side of the room that the switch is located on.
|
Volume, Microphone and Video Screen
VOLUME
These controls adjust the overall volume for the Computer, DVD/CD and VCR sources. Additional volume adjustments for your laptop PC may be done on the computer itself.
SCREEN
- To raise and lower the video screen, simply use the Projection ON and the OFF buttons. Turning a projector on or off automatically raises or lowers the video screen as well.
- You must wait 2 minutes after the projector has been turned on before you can turn the projector off. Additionally, the projector will wait 90 seconds before it can be turned on again after it has been turned off. The projector(s) will automatically cool down for a set time before retracting into the ceiling.
LAVALIERE MICROPHONE
- The wireless Lavaliere Microphone is stored in the second wooden cabinet from the left along with the DVD/CD/VHS player. Simply clip the microphone to your shirt (fairly close to your mouth) and press and hold the power button on the top of the transmitter box to turn it on or off. The microphone should be active once it is turned on, if you are not getting any audio out of it please contact Media Support at 512-232-6679 for assistance.
- To mute the microphone, quickly push the power button and the LED will turn from green to orange indicating that the microphone is muted. Hitting the On button once more will turn off the mute function and the LED will change back to green. The Mic UP/DOWN buttons on the Crestron remote control adjust the Lavaliere microphone volume.
|
DVD, VHS and CD Controls
- The DVD/CD/VHS player is in the second wooden cabinet from the left at the front of the room.
- The remote control for the DVD/CD/VHS player may be checked out from Media Services, and it is necessary for navigating through DVD menus.
- The video volume may be adjusted with the Volume buttons on the Crestron remote control.
- For an optimal video picture you may wish to dim the room lights and close the window shades using the Crestron remote control or wall switches.
DVD INSTRUCTIONS
To use the DVD player, Insert your DVD disk into the player and press the Projection ON button and Video Source button for the screen(s) that you wish to use on the Crestron remote control. You may also need to press the DVD button on the DVD/CD/VHS player itself to put the player in DVD mode.
DVD CONTROLS
- If it is necessary to navigate through your DVD's menu, you will need the remote control for the DVD/CD/VHS player which may be checked out from Media Support.
On the DVD/CD/VHS remote or on the machine itself, press the triangular play button to play the DVD. The square button stops the DVD, the double arrow buttons fast-forward and rewind the DVD and the button with two vertical lines pauses the DVD. Use the Crestron remote control to adjust the volume.
CD INSTRUCTIONS
To use the CD player, Insert your CD disk into the DVD/CD/VHS player's DVD tray. It isn't necessary to start up a video projector to play an audio CD.
CD PLAYER CONTROLS
Press the triangular play button to play the CD. The square button stops the CD, the double arrow buttons skip to the previous and next audio tracks and the button with two vertical lines pauses the CD. Use the Crestron remote control to adjust the volume.
VHS TAPE INSTRUCTIONS
To use the VHS tape source, insert your VHS tape into the DVD/CD/VHS deck's tape slot and press the Projection ON and Video Source buttons on the Crestron remote control interface. You may also need to press the Video button on the DVD/CD/VHS player itself to put the player in VHS mode.
VCR CONTROLS
Press the triangular play button to play the tape. The square button stops the tape, the double arrow buttons fast-forward and rewind the tape and the button with two vertical lines pauses the tape. Use the Crestron remote control to adjust the volume.
|
Doc Cam (Document Camera) Controls
DOC CAM INSTRUCTIONS
To operate the Document Camera (Doc Cam) source, press the Projection On and Doc Cam buttons on the main interface.
SETTING UP DOC CAM
To use the Doc Cam pull the light gray Pull Pad on the unit, which when lifted will turn the Doc Cam on automatically.
If you have turned the unit on but you do not see your image, make sure that the EXT/INT light is OFF.
SLIDE USE
Rotating the camera head so that the lens is aimed at the slide light field will set the camera to Slide. The Zoom will auto zoom to the slide size. To use the camera with a document again, gently rotate the head until you feel a slight click, this is the optimized position for document projection. The Zoom button will return to your last zoom setting.
DOC CAM CONTROLS
The document camera can be controlled through either the lectern's interface screen, or by the buttons on the unit itself.
DOC CAM SCREEN
The Camera buttons turn the Doc Cam on and off. The Focus buttons manually focus the Doc Cam, the Zoom buttons zoom in/out on the document, and the Auto Focus button will automatically focus the Doc Cam. The Light button controls the Doc Cam's onboard light.
DOC CAM BUTTONS
- LIGHT BUTTON
Located on the right side of the base and towards the rear, the light button switches between top light, slide light field and light off. The LIGHT button also works as One Push White Balance key if pressed for 2 seconds.
- POWER BUTTON
The Doc Cam will automatically turn on when it's camera arm has been extended, however this button which is located on the right side of the base and towards the back will manually switch the unit on and off.
- ZOOM WHEEL
The ZOOM WHEEL can be found on the camera head. Holding the zoom wheel lightly down will zoom closer to your object, and holding it lightly up will zoom out from your object. The more you turn the ZOOM WHEEL, the faster the unit will zoom in or out.
- MANUAL FOCUS BUTTONS
When the Manual FOCUS keys are pressed the Doc Cam switches off the autofocus function. Using the Auto focus button switches the autofocus function on again.
- AUTO FOCUS (AF) BUTTONS
Switches the auto focus on and off. The AF light indicates if the AF is switched on.
- FREEZE BUTTONS
Freezes the current image. The FREEZE light indicates if the FREEZE mode is activated.
- EXT/INT BUTTON
Switches between the Doc Cam image and an external input. The EXT/IN light indicates that a signal from the external input is being displayed. If the unit is on, but you are not using an external source and you do not see your image, make sure that the EXT/INT light is OFF.
|