Room Capabilities
LCD Projection, Laptop Computer Connection, Document Camera, Auxiliary Inputs
Controls
On the wall is a control panel with outlets for your computer and auxiliary devices. Computer audio, Ethernet, and external Video connections are available, but only the computer VGA (video) cable is supplied in the room. If you bring your own cables for Ethernet or audio, they should be about 15 feet long. These cables are available for checkout from Media Support.
LAPTOP COMPUTER PROJECTION
Connect the VGA cable (attached to the wall panel) to the VGA port of your computer. If you have audio in your presentation you will also need to connect a PC audio cable (PC Audio and Ethernet cables are available for checkout from Media Support) from your computer to the PC audio jack located underneath the VGA connection. Turn on your computer, press either the right or left Projector ON button, press the PC button and your computer monitor will be displayed on the projection screens. For more information please see the Laptop Projection Instructions below.
Note: Before using any application that accesses the University network through either a public Ethernet or wireless port, you must first open an internet browser application and login to the page that you are automatically directed to with your UTEID. If you have forgotten your UTEID, please visit the UTEID Self-Service Tools page for assistance.
|
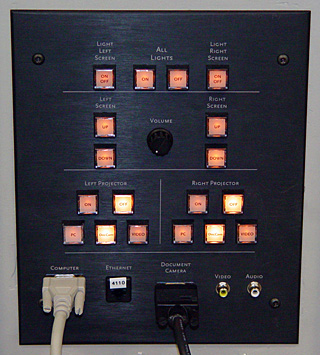
Control Panel Operation
LIGHT LEFT SCREEN/LIGHT RIGHT SCREEN
These buttons control the lights in front of each screen. These lights are best turned off when using the video projectors.
ALL LIGHTS
The On/Off buttons control all of the room lights.
LEFT SCREEN/RIGHT SCREEN
The UP/DOWN buttons raise and lower the video screens
VOLUME
The volume knob adjusts the overall volume for the PC and video sources. Additional volume adjustments for your laptop PC may be done on the computer itself.
LEFT PROJECTOR/RIGHT PROJECTOR
- The ON/OFF buttons turn the left and right projectors on and off.
- The PC button chooses the PC (laptop computer) input.
- The DocCam button chooses the Document Camera input.
- The VIDEO button chooses the Video plug input.
COMPUTER
This VGA cable outlet allows you to hook up your laptop computer. The PC audio jack is located underneath the VGA connection.
ETHERNET
This is an Ethernet outlet.
DOCUMENT CAMERA
This cable outlet allows you to hook up the Document Camera.
VIDEO
This outlet allows you to hook up an external video source.
AUDIO
This outlet allows you to hook up an external audio source.
|
 |
Laptop Projection Instructions
- The room has power outlets, PC Audio and Ethernet (UT network and internet access) jacks, and a built-in VGA video cable to connect your laptop to the LCD Projector.
- Connect the VGA cable (attached to the wall panel) to the VGA port of your computer. If you have audio in your presentation you will also need to connect a PC audio cable (PC Audio and Ethernet cables are available for checkout from Media Support) into the PC audio jack located underneath the VGA connection.
- Turn on your computer, press either the right or left Projector ON button and press the PC button and your computer. If your laptop's screen appears on the room's screen you are ready to go, if not, you may need to mirror your laptop's screen onto the projector. To do this on a Dell computer, hit the FN and F8 keys at the same time until you see your laptop content on the screen. Hitting FN-F8 successively will scroll through the available viewing choices. The command to mirror your laptop's screen may be different on other manufacturer's computers, if you have any questions please consult this Laptop Activation Chart.
- Note: Before using any application that accesses the University network through either a public Ethernet or wireless port, you must first open an internet browser application and login to the page that you are automatically directed to with your UTEID. If you have forgotten your UTEID, please visit the UTEID Self-Service Tools page for assistance.
|
|
Doc Cam (Document Camera) Controls
- The Document Camera plugs in to the wall panel, and can be displayed on the projection screens.
VZ-9 VISUALIZER DOC CAM OPERATION
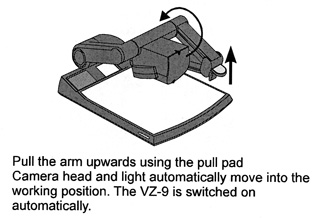
SETTING UP
The top illustration on the right demonstrates how to pull the Doc Cam into its working position. The light gray tab next to the arrow in the picture is the Pull Pad, and the Doc Cam will turn on automatically when the arm is full extended, and the camera head has been rotated up.
If you have turned the unit on but you do not see your image, make sure that the EXT/INT light (see button #7 below) is OFF.
SLIDE USE
Rotating the camera head so that the lens is aimed at the slide light field (the slide-sized white rectangle towards the rear of the unit in the top illustration on the right) will set the camera to Slide. The Zoom will auto zoom to the slide size. To use the camera with a document again, gently rotate the head until you feel a slight click, this is the optimized position for document projection. The Zoom will return to your last zoom setting.
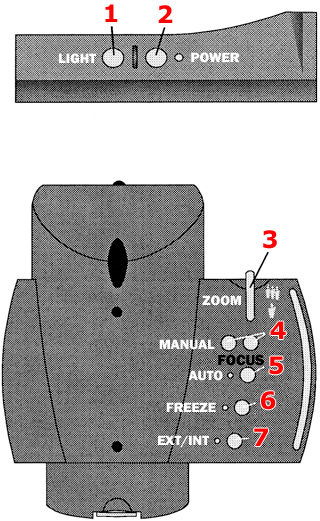
VISUALIZER BUTTONS
(refer to second illustration on right)
- LIGHT BUTTON
Located on the right side of the base and towards the back, the light button switches between top light, slide light field and light off. The LIGHT button also works as One Push White Balance key if pressed for 2 seconds.
- POWER BUTTON
The Doc Cam in GSB 2.124 will automatically turn on when it's camera arm has been extended, however this button which is located on the right side of the base and towards the back will manually switch the unit on and off.
- ZOOM WHEEL
The ZOOM WHEEL can be found on the camera head. Holding the zoom wheel lightly down will zoom closer to your object, and holding it lightly up will zoom out from your object. The more you turn the ZOOM WHEEL, the faster the unit will zoom in or out.
- MANUAL FOCUS BUTTONS
When the Manual FOCUS keys are pressed the Visualizer switches off the autofocus function. Using the Auto Focus button switches the auto focus function on again.
- AUTO FOCUS (AF) BUTTONS
Switches the auto focus on and off. The AF light indicates if the AF is switched on.
- FREEZE BUTTONS
Freezes the current image. The FREEZE light indicates if the FREEZE mode is activated.
- EXT/INT BUTTON
Switches between the Doc Cam image and an external input. The EXT/IN light indicates that a signal from the external input is being displayed. If the unit is on, but you are not using an external source and you do not see your image, make sure that the EXT/INT light is OFF.
|
Setting Up
Visualizer Buttons
|