Multimedia Desk
CAPABILITIES
CONTROLS
Touch the desk's built-in interface screen and it will turn on and become available for use.
VIDEO PROJECTION
To connect by VGA, turn on your computer and plug the desk's VGA cable (attached to the desk under the black plate on the desktop) into the VGA port of your laptop. Press the Projection On, and Computer buttons on the desk's touch screen. If you are connecting through VGA and have audio in your presentation you will also need to connect a PC audio cable (PC Audio cables are available for checkout from Media Services Requests.)
To connect by HDMI, turn on your computer/mobile device and plug your HDMI cable (bring your own HDMI cable. Cables are also available for checkout at Requests) into both your computer/mobile device and the desk's HDMI port. Press the Projection On, and Computer buttons on the desk's touch screen.
WIRELESS NETWORK CONNECTIONS
For wireless network access please visit Connect to WIFI on Campus for instructions on how to access the campus wireless network.
RED PHONE
There is a red phone on the wall below the screens that directly contacts Media Support. Please use this phone if you have any questions or difficulties.
AFTER-HOURS EVENTS
To use the multimedia desk on weekends or after 5pm on weekdays, users must have an ACCESS ID card that has been pre-programmed by Media Support. To receive an ACCESS ID you will need to call 232-6679 and supply your name, UTEID, and a card number for us to program in advance of the event.
|
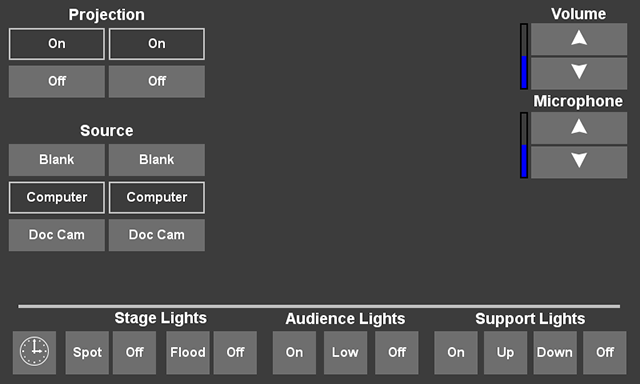
Desk Interface
|
Laptop Cable Connection
- The desk has built-in power outlets, an HDMI port and a built-in VGA video cable to connect your laptop to the LCD Projector, and a PC Audio port.
- To connect by VGA, turn on your computer and plug the desk's VGA cable (attached to the desk under the black plate on the desktop) into the VGA port of your laptop. Press the Projection On, and Computer buttons on the desk's touch screen. If you are connecting through VGA and have audio in your presentation you will also need to connect a PC audio cable (PC Audio cables are available for checkout from Media Services Requests.)
- To connect by HDMI, turn on your computer/mobile device and plug your HDMI cable (bring your own HDMI cable. Cables are also available for checkout at Requests) into both your computer/mobile device and the desk's HDMI port. Press the Projection On, and Computer buttons on the desk's touch screen.
- If your laptop's screen appears on the room's screen after you have connected your computer you are ready to go. If not, you may need to mirror your laptop's screen onto the projector. To do this on a PC computer, hold down the "Windows" button on the keyboard (next to the "Alt" key) and tap the "P" key. On a Mac computer press the FN-F7 keys to toggle between mirrored and dual screen use after an external display has been detected. The command to mirror your laptop's screen may be different on other manufacturer's computers, if you have any questions please consult this Laptop Activation Chart.
|
Video Projection
PROJECTION ON
Turns on projector(s). While the projector starts up, the Projection OFF button may be blanked out for up to two minutes.
PROJECTION OFF
Turns off projector(s). The projector will wait two minutes before it can be turned on again after it has been turned off.
SOURCE BLANK
Blanks out the image on the projection screen(s), so that the audience cannot see the projected image temporarily (e.g. when making a change or entering data that you do not want the audience to see, or to blank the display before a test.) This button will not turn the projector off.
|
|
Source Selection
- Press the Projection ON button(s) and then the Source button(s) that you wish to use.
- There are additional instructions for the Computer and Doc Cam sources available on this page.
BLANK
Temporarily blanks out the image on the projection screen(s.)
COMPUTER
Selects the Laptop PC input to be displayed on the screen.
DOC CAM
Selects the ceiling-mounted document camera input to be displayed on the screen.
|
|
Doc Cam (Document Camera) Controls
DOC CAM INSTRUCTIONS
To operate the Document Camera (Doc Cam) source, press the Projection On and Doc Cam buttons on the main interface.
DOC CAM BUTTONS
Power
Pressing this key switches the unit on and off.
Zoom
Controls the camera zoom to change size of pick-up area.
CAS, Capture Area Shifting
When zooming documents in, the lower parts of the document might not be picked-up by simply moving the document.
Use the Capture Area Shifting mode to scroll down the page.
Light On/Off
Switches the top light on and off.
The LIGHT key also works as ONE PUSH WHITE BALANCE key if pressed for 2 seconds.
Freeze
Freezes the current image.
Menu
Pressing the MENU key activates the on-screen menu.
+ Zoom
Controls the camera zoom to change size of pick-up area.
AF/Focus
Pressing this key toggles the Auto Focus on and off.
Manual Focus
- Press and hold the AF/FOCUS key for 2 seconds activates the manual focus mode. The status LED is flashing.
- Use the + FOCUS key (FREEZE) to adjust the focus NEAR, or the - FOCUS key (AF/FOCUS) for far.
- To finish the manual focus mode, press the MENU key quickly.
- Please note: The on-screen menu and the FREEZE function are not available in this mode.
|
|
Lights
STAGE LIGHTS
Controls spotlights/floodlights on the stage.
AUDIENCE LIGHTS
Controls the lights in the audience area.
SUPPORT LIGHTS
Controls the secondary lighting in the audience area when the main audience lights are off.
|
Timer/Clock
TIMER
To enable the Timer function, which displays a countdown timer on the LED screen above the stage, first touch the clock icon button on the lower left corner of the interface. Then press Show Timer and set a time period with the buttons to the left (Hours, Minutes, Seconds.) Hit Start/Pause and the timer will begin to count down from the time that you have set. The Reset button returns the timer to the original time that you entered.
When the timer hits zero, a small buzzer will sound at the desk to alert the user that the time has expired.
Caution: If you start the timer and then hit the Show Clock button, your timer will lose its' progress and be reset.
CLOCK
When you hit the clock icon in the lower left corner of the interface, the Clock/Timer screen will appear. By default, the clock should appear, displaying the current time. If it does not, it will appear after 1 minute of Timer inactivity. If the Timer function is showing in the display and you need to see the Clock, hit the Show Clock button.
Caution: If you start the timer and then hit the Show Clock button, your timer will lose its' progress and be reset.
|
Volume and Microphone
VOLUME
These controls adjust the overall volume for the COMPUTER source. Additional volume adjustments for your laptop PC may be done on the computer itself.
MICROPHONE
These controls adjust the overall volume for the wireless microphone.
WIRELESS MICROPHONE UNIT
The wireless Lavaliere Microphone is stored in the drawer on the right-hand side of the desk. Simply clip the microphone to your shirt (fairly close to your mouth) and press and hold the power button on the top of the transmitter box to turn it on or off. The microphone should be active once it is turned on, if you have any questions please use the red phone on the wall for assistance.
To mute the microphone, tap the power button and the LED will turn from green to orange indicating that the microphone is muted. Tapping the on button once more will turn off the mute function and the LED will change back to green.
|