Multimedia Desk
CAPABILITIES
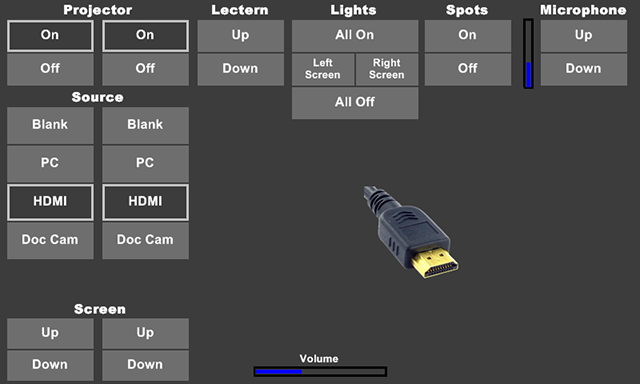
CONTROLS
Touch the desk's built-in interface screen and it will turn on and become available for use.
NETWORK CONNECTION
Please visit Connecting to utexas WiFi for instructions on how to access the campus wireless network.
VIDEO PROJECTION
The desks have HDMI and VGA connections to attach your laptop or mobile device for video projection.
To connect by VGA, turn on your computer and plug the desk's VGA cable (attached to the desk under the black plate at the top rear of the desk) into the VGA port of your laptop. Press the Projection On, and VGA buttons on the desk's touch screen.
To connect by HDMI, turn on your computer/mobile device and plug your HDMI cable (HDMI cables are available for checkout at Requests) into both your computer/mobile device and the desk's HDMI port. Press the Projection On, and HDMI buttons on the desk's touch screen.
|
Desk Interface
|
Desk/Lectern Operation
Press and hold the Lectern Up/Down buttons on the desk interface to raise and lower the desk to your preferred height.
|
Laptop Cable Connection
The desk has two power outlets, a computer audio jack, an HDMI port, and a built-in VGA video cable to connect your laptop/mobile device to the room's LCD Projector.
To connect by VGA, turn on your computer and plug the desk's VGA cable (attached to the desk under the black plate at the top rear of the desk) into the VGA port of your laptop. Press the Projection On, and VGA buttons on the desk's touch screen.
To connect by HDMI, turn on your computer/mobile device and plug your HDMI cable (HDMI cables are available for checkout at Requests) into both your computer/mobile device and the desk's HDMI port. Press the Projection On, and HDMI buttons on the desk's touch screen.
You may need to mirror your laptop's screen to the classroom's LCD projector for a successful connection. To do this on a PC computer, hold down the "Windows" button on the keyboard (next to the "Alt" key) and tap the "P" key. On a Mac press the FN-F7 keys to toggle between mirrored and dual screen use after an external display has been detected. The command to mirror your laptop's screen may be different. If you have further questions please consult this Laptop Activation Chart.
|
Video Projection
PROJECTION ON
Turns on the room's LCD projector. While the projector starts up, the PROJECTION OFF button may be blanked out for up to two minutes.
PROJECTION OFF
Turns off the room's LCD projector. The projector will pause for two minutes before it can be turned on again after it has been turned off.
PROJECTION BLANK
Temporarily blanks out the image on the projection screen. This allows a user to make content changes that you do not want the audience to see, or to blank the display before a test. This button will not turn the projector off.
|
Source Selection
- Press the Projection ON button and then the source button that you wish to use.
- Source connections are located under the black plate at the top rear of the desk, and on the black panel on the front of the desk.
- There are additional instructions for the VGA/HDMI and DOC CAM sources on this page.
HDMI
Selects the HDMI port input to be displayed on the screen.
VGA
Selects the VGA Cable input to be displayed on the screen.
DOC CAM
Selects the ceiling-mounted document camera input to be displayed on the screen.
|
Lights
LIGHTS
Controls the desktop lighting.
SUPPORT
Controls the room's recessed lighting.
|
Volume, Microphone, and Lectern Controls
VOLUME
Adjusts the overall volume for the VGA and HDMI sources. Additional volume adjustments for your laptop computer/mobile device may be done on the device itself.
MICROPHONE
Adjusts the microphone volume (microphones are available for checkout at Requests).
LECTERN
Lowers and raises the desk to allow for desk or lectern use.
|
Doc Cam (Document Camera) Controls
DOCUMENT CAMERA INSTRUCTIONS
To operate the Doc Cam source, press the Projection ON and Doc Cam buttons on the main interface.
DOC CAM CONTROLS
The Document Camera is mounted in the ceiling and it is focused on the top of the desk. Place your document on the desktop and refer to the video screen for optimal document placement. The Zoom In and Zoom Out buttons adjust the camera and may help in achieving the best picture. The Auto-Focus button will focus the Doc Cam on your document. If necessary, hit the Focus In or Focus Out buttons for fine tuning.
|